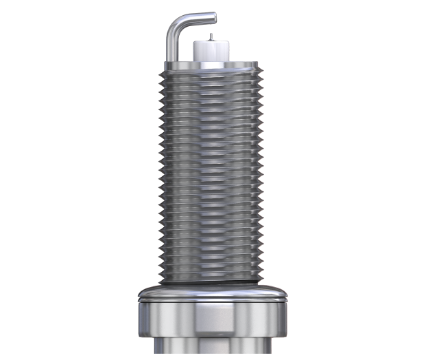
AUTOLITE® Iridium Ultra®
Advanced engines need advanced technology, which is why we have engineered a premium spark plug that can meet the critical demands of late model engines. Iridium Ultra® is equipped with a laser-welded iridium-enhanced finewire center electrode that ensures your engine runs at maximum performance; while its double precious metal design provides increased durability*, allowing your engine to maintain desired performance levels for longer. Iridium Ultra® delivers optimal fuel efficiency, acceleration, and ignitability**, making it the best OE replacement plug choice for modern engines.

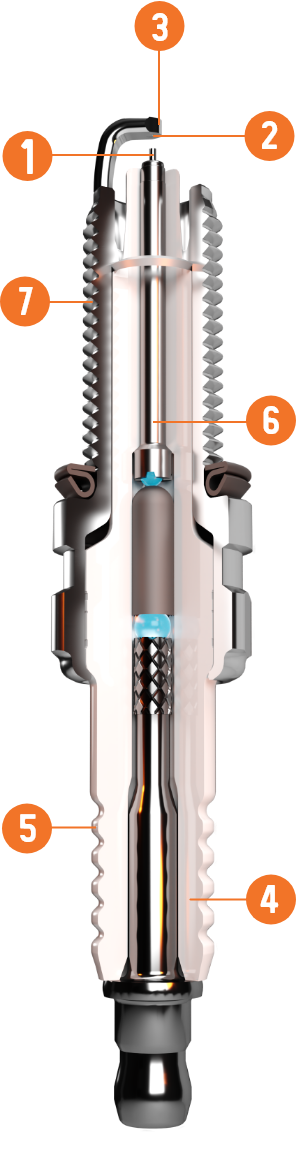
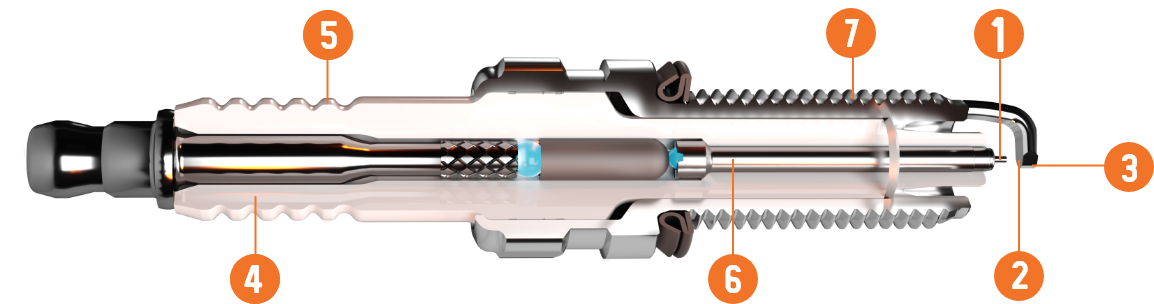
The iridium-enhanced laser-welded finewire center electrode provides focused ignition, optimal ignitability, and maximum performance
Its proprietary platinum ground electrode provides increased durability and resistance to wear, extending the life of the plug
Its tapered ground wire enhances ignitability for improved combustion & performance
Its high alumina ceramic insulator provides thermal conductivity and superior insulation for increased strength
Multi-rib insulator prevents flash-over
The copper core within the plug provides reliable performance with higher thermal conductivity
Nickel-plated shell is corrosion resistant to provide increased durability for extended life
*Compared to 0.8 mm finewire, multi-electrode design and standard spark plugs.
**Compared to average of other premium brands.
***Versus standard copper core spark plugs
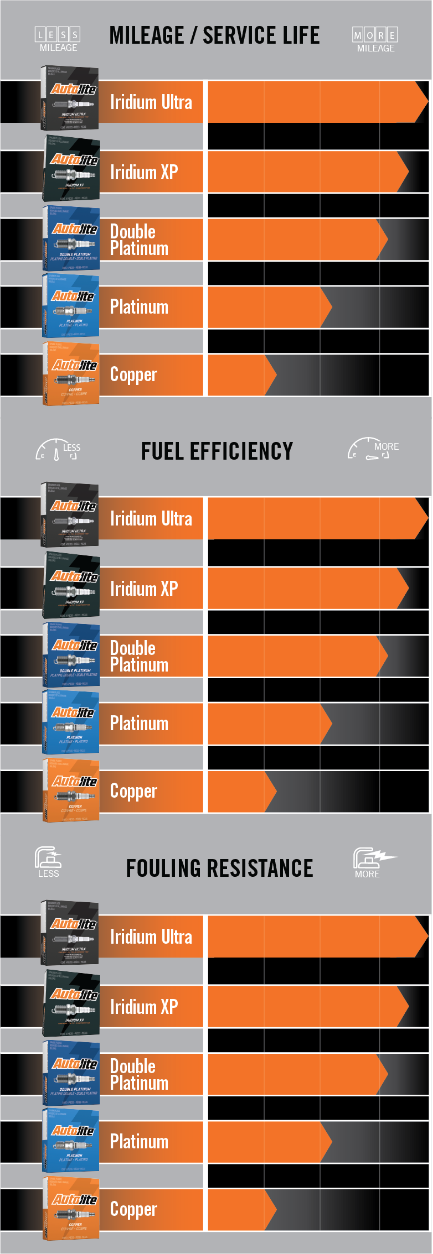
Metallurgy Comparison Chart

Spark Plug Installation and Service Suggestion
Replacing spark plugs can be a simple job, if you take things one step at a time. Here's a general guide to the proper procedures.
Read the entire process first!

Gather needed tools and parts - a set of Autolite spark plugs, a ratchet, a spark plug socket (make sure you have the right size), extensions, a gapping tool, and dielectric grease. Other hand tools may be needed on some vehicles.
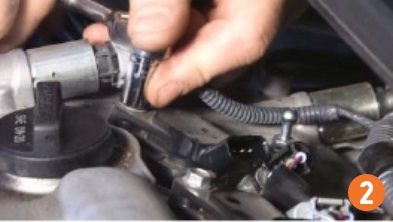
Remove spark plug wires or coils. Grasp the plug wire boot and twist it about one-quarter turn to loosen the seal, and then pull straight off. Stubborn boots may require using plug wire boot pliers. Number plug wires with tape as you remove them to avoid crossing them, or only disconnect one at a time. If your vehicle is coil-on-plug, disconnect the coil connectors, remove the hold-down bolts, and remove the coils.

Before loosening each spark plug, clean dirt or fluids out of the plug seat area with a blast of compressed air, a shop vacuum, or by blowing around the spark plug through a soda straw. This prevents contaminants from falling into combustion chamber when the old plugs are removed.
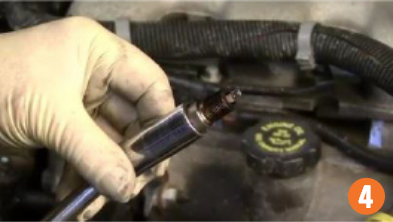
Remove plugs and line them up in cylinder order. A thorough visual inspection of the plugs can identify problems that may need correction or show you they are all good. Autolite publishes a plug tip inspection guide with more information.
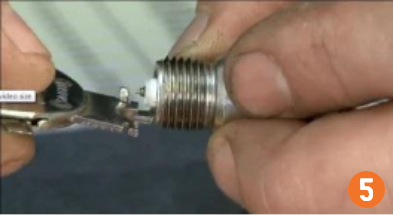
Gap new plugs as recommended in owner's manual or Autolite Spark Plug Catalog. Use a gapping tool gauge to measure the gap between the center and ground electrode. The gauge should pass through snugly but easily. If too loose or tight, use the gapping tool to correct the gap.

Screw new plugs in by hand until tight. If a plug tightens up too soon while turning them in by hand, use a thread chaser to clean the threads. Use a torque wrench to tighten spark plugs following manufacturer’s recommendations, or refer to the torque chart in the Autolite Spark Plug Catalog if you don’t have a torque wrench.
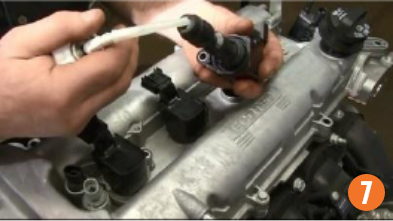
Inspect the plug wires and boots (or the coils and boots on coil-on-plug systems) for brittleness or cracking, and check for corrosion onthe plug terminals inside each boot. Replace suspect coils, boots and or wires as needed. Lubricate the plug contact area inside each boot with Dielectric Grease and then reinstall the plug wires (or coils and boots) making sure they are installed in the correct order and fastened securely.

Verify your repair by starting the engine. Misfires or a rough idle can mean the wires are in the wrong order or loose. Recheck firing order and coil connections closely if the engine still isn't running right.
Torque Specifications

The iridium-enhanced laser-welded finewire center electrode provides focused ignition, optimal ignitability, and maximum performance
Its proprietary platinum ground electrode provides increased durability and resistance to wear, extending the life of the plug
Its tapered ground wire enhances ignitability for improved combustion & performance
Its high alumina ceramic insulator provides thermal conductivity and superior insulation for increased strength
Multi-rib insulator prevents flash-over
The copper core within the plug provides reliable performance with higher thermal conductivity
Nickel-plated shell is corrosion resistant to provide increased durability for extended life
*Compared to 0.8 mm finewire, multi-electrode design and standard spark plugs
**Compared to average of other premium brands
***Versus standard copper core spark plugs
Replacing spark plugs can be a simple job, if you take things one step at a time. Here's a general guide to the proper procedures.
Read the entire process first!
Gather needed tools and parts - a set of Autolite spark plugs, a ratchet, a spark plug socket (make sure you have the right size), extensions, a gapping tool, and dielectric grease. Other hand tools may be needed on some vehicles.
Remove spark plug wires or coils. Grasp the plug wire boot and twist it about one-quarter turn to loosen the seal, and then pull straight off. Stubborn boots may require using plug wire boot pliers. Number plug wires with tape as you remove them to avoid crossing them, or only disconnect one at a time. If your vehicle is coil-on-plug, disconnect the coil connectors, remove the hold-down bolts, and remove the coils.
Before loosening each spark plug, clean dirt or fluids out of the plug seat area with a blast of compressed air, a shop vacuum, or by blowing around the spark plug through a soda straw. This prevents contaminants from falling into combustion chamber when the old plugs are removed.
Remove plugs and line them up in cylinder order. A thorough visual inspection of the plugs can identify problems that may need correction or show you they are all good. Autolite publishes a plug tip inspection guide with more information.
Gap new plugs as recommended in owner's manual or Autolite Spark Plug Catalog. Use a gapping tool gauge to measure the gap between the center and ground electrode. The gauge should pass through snugly but easily. If too loose or tight, use the gapping tool t correct the gap.
Screw new plugs in by hand until tight. If a plug tightens up too soon while turning them in by hand, use a thread chaser to clean the threads. Use a torque wrench to tighten spark plugs following manufacturer's recommendations, or refer to the torque chart in the Autolite Spark Plug Catalog if you don't have a torque wrench.
Inspect the plug wires and boots (or the coils and boots on coil-or plug systems) for brittleness or cracking, and check for corrosion on the plug terminals inside each boot. Replace suspect coils, boots and or wires as needed. Lubricate the plug contact area inside each boot with Dielectric Grease and then reinstall the plug wires (or coils and boots) making sure they are installed in the correct order and fastened securely.
Verify your repair by starting the engine. Misfires or a rough idle can mean the wires are in the wrong order or loose. Recheck firing order and coil connections closely if the engine still isn't running right.